Monday, March 4, 2013

Crochet Infinity Scarves


Vivienne Burgundy infinity scarf

How to crochet infinity scarves:
Worked in rounds, upwards.
Ch the number needed to achieve desired circumference. This depends on how many "wraps" you want for your scarf. I usually ch around 140 or 150.
Join ch, careful not to twist.
Work stitches (hdc, sc, or dc) across and you can join at the end of each round with a slip stitch, or just continue around in a spiral for a seamless loop.
Join at the end of the last round (# rounds depend on desired width).


I'm finding that I am really fad-functional. This means that I usually get into something and that something consumes my attention for a while, until I move onto the next fad.
As of late, even with spring just around the corner, I have been really feeling the whole infinity scarf thing. They are just so lovely and versatile. Not to mention they are really appealing in photographs. 

An infinity scarf is just a scarf that is connected into a circle. I think they are appealing because they don't have any detestable ends sticking out in nether-regions. It's a nice finish all around. Also, I think because it's much easier to wrap around one's neck than a standard rectangular long scarf. 

So, here are a few I've just finished making and posted in my Etsy shop.


Tuesday, February 19, 2013

Aritzia Online: Shopping Review

On Boxing Day, I came across the Atlantic Hoodie by TNA, at an Aritzia store. I immediately fell in love with it because of its ultra-softness and extra long length. It was on sale for only $10 off, but as those die-hard Aritzians out there will know, this is about as good as it gets.

Aritzia only recently launched their online shopping portal, in October 2012 and I thought I would review my experience here for other fellow online shopaholics who are curious! I know I did some web searches before my own purchase just because the site is so new and it's easy to be scammed by customs, hidden fees, or other extraneous online charges if you are not careful.

Well, I decided to purchase a black Atlantic hoodie (size S) because I seriously own too many grey sweaters and I already got the same hoodie in Salt and Pepper on on Boxing Day. At first glance, the site is primitive.


It barely uses flash, and the shopping sections don't allow zoom or alternate views.
However, the pricing automatically detects your location based on your IP address and it will convert to CDN or US $$ so the prices shown are domestic.

Placing the order was quite smooth too, you just add the color and size to your cart. You have to sign up for an account but that didn't take too long. You also have to pay by credit card as there was no option for PayPal so that's something they will need to work out.

Shipping was $8.00 flat to anywhere in Canada (standard shipping). I've heard they have promos for free shipping but since all their stuff is pricier, $8 is really not that much in comparison.

My item arrived in under a week's time (there was also a long weekend in between). I placed my order on a Tuesday and (including a holiday Monday), it arrived the following Tuesday via UPS.

This is the package containing the hoodie, very fancy:


And the receipt was tucked ever so sophisticated-ly in this premium envelope:


Overall, I'm very impressed with the Aritzia online shopping system and I'm sure it will just continue to improve. This will definitely not be the last time I order something, unfortunately for my wallet!!


Monday, February 11, 2013

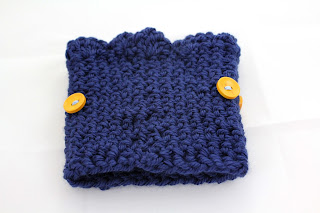
New crochet pattern: Ruffle Crown Tea Cozy

I finally came up with a simple tea cozy pattern for tea cups, tea mugs and even skinny travel mugs that don't have a good insulation.
It features a cute scalloped edging and you can embellish with buttons, lace, or ribbon.
I've gone a little overboard with buttons, as you can probably tell.

Here I have 4 wooden buttons (15mm in diameter) two on opposite faces of the cozy.
It's quite stretchy so it should fit most standard circumference mugs with no handles.
You will need to know how to work in the round and also how to work foundation single crochets. This is a good tutorial for the fsc here.

Pattern available here.
You can purchase the finished cozy pictured below in my Etsy shop.

Materials: 
H hook 5.0mmm
1/4 of a ball of yarn (great with leftover yarn lengths)
Yarn needle
Notions like 4X 15mm diameter wood buttons


Pattern:
Worked in spiral rounds without joining. Use a marker in first st of each round to mark your place at the start of each round. All stitches worked through back loops only of the stitch below.

Available for purchase here.

Embellish by sewing on buttons at equal intervals and at same level on opposite face of the cozy. The starts of the spirals should not be noticeable so the rounds are uniform throughout.

(c) karliboutique
You may not reproduce or replicate any part of this pattern. If you wish to sell finished products from this pattern, please link back to this blog post: http://karliboutique.blogspot.ca


Wednesday, February 6, 2013

Free Crochet Pattern: Penny Cozy Wool Mittens

Penny Cozy Mittens Crochet pattern. In honour of Canada ceasing distribution of our penny, I have named my new mittens pattern after our has-been 1-cent token.

Here are some fun facts about the Canadian penny:

  • other names for the penny have been "one-cent coin" or a "copper"
  • the very first Canadian penny appeared on scene in 1858
  • the first batches were made at the Royal Mint in London, England and shipped overseas to Canada
  • on Jan 2, 1908, the Royal Canadian Mint opened in Ottawa and we finally could make the penny on domestic soil
  • production of the penny actually ceased in May, 2012
  • the backside of the penny shows Queen Elizabeth II (monarch at the time of issue)
  • this design has been revamped 3 times in history
  • between May 2006 to Oct 2008, each penny made from 1942 to 1996 was actually estimated to be worth $0.02 apiece because of the value of copper (which was a major constituent of the penny material in this period)
...And now you know!!


This pattern is for a pair of cozy, warm bulky mittens and it is  free here in PDF. I would love to see a photo of how these turn out for you!

You can purchase a pair of these mittens pre-made in my Etsy shop!


These bulky, soft mittens are great for beginners to practice working in the round. Each round spirals into the following round. Rounds are joined at the end. This pattern uses standard US abbreviations and crochet terms.


Materials:
     Bulky or 5 Weight Yarn (~ 100yds) – Use Alpaca or Wool blend yarn to create an extra soft feel
S   Size I Crochet Hook (5.5mm)
      4 X 15mm wood buttons or other buttons of your choiceYarn threading needle

Abbreviations:
sl st= slip stitch
ch = chain
sc=single crochet
dc = double crochet
RS= right side
Rnd=round
Sts=stitches
St=stitch
Dc2tog= double crochet two stitches together (join as one stitch)
The Pattern: (Make 2)
RIBBING
Ch 9.
Row 1: Sc in 2nd ch from hook and in each ch across – (8  sts)
Row 2: Ch 1, turn, working in back loops only, sc in each sc across. (8sts)
Row 3-Row 19: Rep Row 2.  Ribbing piece should measure 6.5in from beginning.
Joining:
Fold fabric in half with short ends aligned, sl st across both layers (8sts), making sure short ends are aligned to join last row to first row. Do not fasten yarn.
BODY
Rnd 1 (right side): Turn ribbing fabric 90 degrees, Ch 1, 20  sc at regular intervals around top edge of Ribbing; join with sl st in first sc.
Rnd 2: Ch 2 (not counted as a proper st here and throughout), dc in each sc around; join with sl st in top of starting ch.
Rnd 3: Ch 2, dc in first 8 dc’s, 2 dc in next dc, dc in nxt 2 dc, 2 dc in next dc, dc in last 8 dc; join with sl
st in top of starting ch (22sts)
Rnd 4: Ch 2, dc in first 9 dc, 2 dc in next dc, dc in nxt 2 dc, 2 dc in nxt dc, dc in next 8 dc, 2 dc in last
dc; join with sl st in top of starting ch (25 sts)
Rnd 5: Ch 2, dc in first 10 dc’s, 2 dc in next dc, dc in next 2 dc, 2 dc in next dc, dc in last 11 dc; join with
sl st in top of starting ch (27sts)
THUMB OPENING
Rnd 6: Ch 2, dc in first 10  dc, ch 2, sk nxt 7 dc for thumb space, dc in last 10 dc; join with sl st in top of
starting ch  (20 sts and 1 ch)
HAND
Rnd 7: Ch 2, dc in each dc and ch around; join with sl st in top of starting ch- (22 dc sts)
Rnd 8: Ch 2, dc2tog, dc in each dc until last 2 dc, dc2tog; join with sl st in top of starting ch – (20 sts)
Rnd 9: Ch 2, dc in each dc around; join with sl st in top of starting ch. (20 sts)
DECREASING ROUNDS:
Rnd 10: Ch 2, dc2tog, dc in next 8 dc, dc2tog, dc in last 8 dc; join with sl st in top of starting ch – (18 dc sts)
Rnd 11:  Ch 2, dc2tog, dc2tog, dc in next 10 dc around, dc2tog, dc2tog (14dc sts)
Rnd 12: Ch2, dc2tog, dc2tog, dc in next 6 sts, dc2 tog, dc2tog (10dc sts)
Rnd 13: Ch2, dc2tog, dc in next 4 sts, dc2tog (6dc sts)
Tie off and weave tail ends through sts of last rnd and pull to close opening. Tie off again.
THUMB
With RS facing you, join yarn with sl st at side of thumb opening.
Rnd1: Ch 2, dc in each skipped dc (7 skipped) and sc in each ch (2chs) of thumb opening – (9sts)

Rnd2: Ch2, dc in each st (9sts)

Rnd3: Ch2, dc2tog, dc in each of the following 3 dcs, dc2tog, dc2tog (5sts), sl st at starting ch, tie off and pull top opening tight, weave in ends.

FINISHING

Weave in loose ends with yarn needle.
BUTTONS

Sew 2 wood buttons at top of sc ribbing, 1 inch from outer hand border.

(Or sew on at any location of your choice for a cute, stylish look)
Turn other mitten around and repeat. Ensure you sew buttons on RS of mitten!


© karliboutique

You may not reproduce, sell, or replicate any part of this pattern. You may use finished products for commercial purposes but please link back to my blog post: http://karliboutique.blogspot.com. Every effort has been made to test and ensure the accuracy of this pattern. 

Tuesday, February 5, 2013

Wrap it up with a headband

My latest projects have been these crochet headbands, embellished with wooden buttons.
These headbands are relatively fast projects and great for using leftover yarn when you just don't have enough for a scarf or cowl. They only require half a regular skein (1 or 2 balls).
The great thing is that these bands will keep your ears warm but it won't mess up your updo like a hat would!

Check out this Simple Ribbed Headband pattern to make your own chunky ribbed headband!!

All these creations are now available in my Etsy shop!!

Madison Ribbed Chunky Headband with Flower Buttons


Marble Headband with Buttons (Pink and Purple)


Karina  Cable Headband Earwarmer
!

Friday, February 1, 2013

Woven Garment Tags

For those who sell garments, accessories, or any wearable item, I just received a box of beautiful woven logo tags from an overseas Etsy shop: worldsalelabel

The price was very reasonable, $55.00 for 300 woven tags. I thought I would have to wait a long time but they came in only 2 weeks!! They are very high quality and you can choose two colours. I only got text but you can upload logos and choose more premium options. The order was very smooth, you send them your shop/brand name and a customer service rep emails you back and forth to discuss dimensions and colours and sizing. They will even send you a proof of the final design before they send the label to production.
Oh, and not to mention the shipping is FREE!

I'm very happy with these labels and now I just have to learn to use my mini sewing machine to label all the items in my shop!


Thursday, January 31, 2013

Fingerless Gloves: Patterns

The latest craze all over the web is fingerless gloves or wristwarmers.
There are many other names for these cuffs, can you think of a few more?

Part of the allure may come from the fact that you can still wear them inside AND you can still use your touchscreen phone outside.
Of course, these are only suitable for cooler temperatures and not freezing weather!!

Still, they make such a fashion statement.
I made these up last night, just a simple and basic pattern to get the measurements needed for further embellishment.

Fingerless Gloves Wristwarmers by karliboutique on Etsy


I'm working on my pattern so stay tuned for it in the next couple of days. In the meantime, here are some free patterns I found on the net that looked really cute:

1) Adeline Fingerless Mitts on crochetdreamz.blogspot.ca
A very unique cabled pattern using chain stitches to create easy "crochet cables"

2) Free Simple Fingerless Gloves by Amy Solovay
Simple starter pattern. Thumb hole is made just by sewing the edges and leaving a gap...

3) Puff Stitch Fingerless Gloves by Olivia on her "My Favourite Things" blog
Really cute puffy textured!!

Wednesday, January 30, 2013

Crochet Cowl Pattern, Convertible Cowl & Shawl

Extra long cowl crochet pattern: Downloadable.

This is a beautiful and luxurious extra bulky and long cowl. I made it in Cozy Wool (Pewter color) and it's so soft, like wearing a trendy blanket on your neck. I personally love it, and have made a few for others :)

You can wear it multiple ways, up to your nose, or down to your shoulders!
The ribbing is such a nice texture too. Great for cool or COLD weather.
The pattern is good for a size small or medium.


Find the finished product in my Etsy shop (karliboutique).
Purchase my pattern for only $1.99 here. Full email support included!

Materials:

P 10mm Hook
Super Bulky 6 weight yarn 180yds or 164m
(I used Loops and Threads Cozy Wool in Pewter)
Yard Needle